
How to test purge valve with multimeter
The purge valve is a device that comes with peculiarities of its own.
Unlike other components in your engine, mechanics take more time to point fingers at it when problems arise.
Ironically, it is one of the simplest components to run tests on.
There are multiple techniques to use, however, a lot of people don’t know what to do.
This article tells you all you need to know about the purge valve, including how it works and the various methods of diagnosing it with a multimeter.
Let’s get right in.
What Is A Purge Valve?
A purge valve is an important component within modern Evaporative Emission Control Systems (EVAP) that helps to increase fuel efficiency and reduce emissions.
During combustion, the EVAP purge valve prevents fuel vapor from escaping into the atmosphere by storing it inside a charcoal canister.
Once the Powertrain Control Module (PCM) sends a signal to the purge valve, this fuel vapor is released into the engine for combustion, acting as a secondary source of fuel.
While doing this, the PCM ensures that the purge valve opens and closes at the right time to release the right amount of fuel vapors to the engine.
Problems With The Purge Valve
A purge valve may develop several faults.
- Purge Valve Stuck Closed
When the purge valve is stuck close, you experience engine misfiring and difficulties starting.
However, the PCM easily notices this problem and the engine lights come up on the car’s dashboard.
- Purge Valve Stuck Open
When the purge valve is stuck open, there is no control over the amount of fuel vapor released into the engine.
This also causes engine misfiring and difficulties starting, and is harder to notice because the car continues to work.
- Power Terminal Problem
There may be problems with the power terminals that connect it to the PCM.
This means that, when faulty, the purge valve doesn’t receive the right communication from the PCM to perform its duties.
A multimeter helps to run appropriate tests on this, as well as tests on other car components.
How To Test Purge Valve With Multimeter (3 methods)
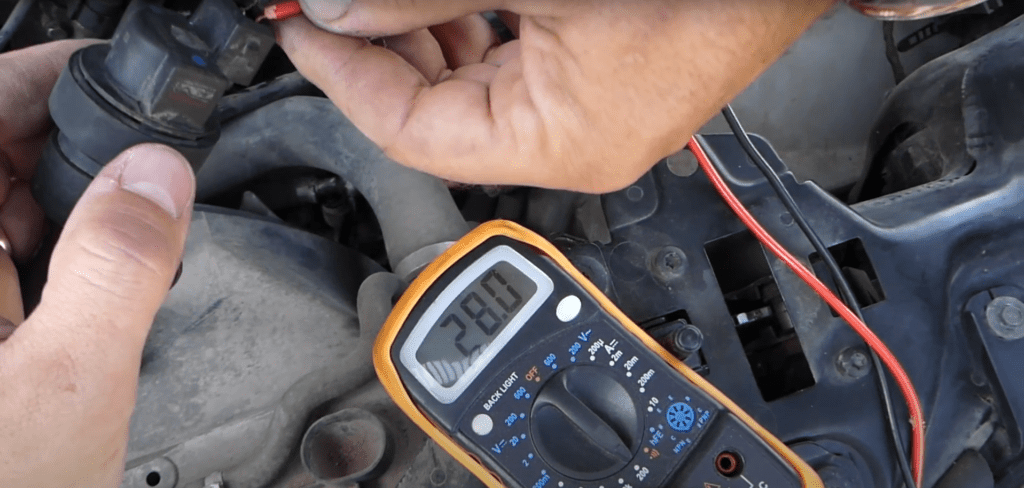
To test your purge valve, set your multimeter dial to Ohms, place the probes on the power terminals of the purge valve, and test for resistance between the terminals. A reading below 14 Ohms or above 30 Ohms signifies a bad purge valve, and it needs to be changed.
There is more to this as well as other methods of testing if a purge valve is in good condition or not, and we will get onto them now.
Method 1: Continuity Test
Most purge valves are solenoid and a continuity test helps to ensure that the metallic or copper coil running from the positive to the negative terminals is okay.
If this coil is bad, the purge valve doesn’t work. To run this test, follow these steps.
- Disconnect The Purge Valve From The Car
To have proper access to your purge valve and test for continuity, you have to disconnect it from the car.
Before doing this, make sure the car has been switched off for at least 30 minutes.
You disconnect the purge valve by unscrewing the clamps for the inlet and outlet hoses, and also separating it at the power terminal.
The inlet hose comes from the fuel tank and the outlet hose goes to the engine.
- Set Your Multimeter To Continuity Mode
Set your multimeter dial to continuity mode, which is usually represented by a “sound wave” icon.
To test if this mode is set right, place the two multimeter probes on each other and you will hear a beeping sound.
- Position The Multimeter Probes On Terminals
Once your multimeter has been properly set, you simply place the probes on the purge valve’s power terminals.
- Evaluate Results
Now, if the multimeter does not produce a beeping sound when you place the probes at the power terminals, then the coil inside the purge valve is damaged and the whole valve needs to be replaced.
If the multimeter produces a beeping sound, then you proceed to run other tests.
Method 2: Resistance Test
The purge valve may not be working properly because the resistance between the positive and negative terminals is too low or too high.
The multimeter also helps you run a diagnosis on this by following these steps.
- Disconnect The Purge Valve From The Car
Just like testing for continuity, you totally disconnect the purge valve from the car.
You unscrew the hose clamps and also separate the valve at the power terminal.
- Set Your Multimeter To Ohms
To measure the resistance in your purge valve, you set your multimeter dial to Ohms.
This is usually represented by the Omega character (Ω) on the multimeter.
To confirm it is set properly, the multimeter screen is expected to display “O.L”, which means open loop, or “1”, which represents an infinite reading.
- Position Multimeter Probes
Simply place the multimeter probes on the purge valve’s power terminals.
- Evaluate Results
This is where you pay attention. A healthy purge valve is expected to have a resistance between 14 Ohms and 30 Ohms, depending on the model.
If the multimeter displays a value that is higher or lower than the appropriate range, then your purge valve is faulty and needs to be changed.
If the value falls within this range, then move on to other steps.
The multimeter is not required for these other steps but they prove to be useful for making diagnoses on a stuck open or stuck closed problem.
Method 3: Mechanical Tests
The mechanical click tests include a purge valve click test and purge valve vacuum test.
Purge Valve Click Test
The purge valve click test helps to identify a stuck closed problem.
Ordinarily, when the engine works, a signal is sent to the purge valve at intermediaries to open up and allow fuel vapor to get in.
A clicking sound is produced each time the valve opens up, and this is what you want to check for.
To run a simple test, follow these steps.
Once the purge valve is disconnected from your car, connect it to power supply by simply attaching it to the car battery. This is a simple set up and all you need is alligator clips, a 12-volt battery, and your ears.
Place two alligator clips on each of your purge valve’s power terminals and place the other end of both clips on each of your battery posts. This means one alligator clip goes to the positive battery post and one goes to the negative post.
A good purge valve emits a clicking sound once the clips are connected properly. As said earlier, the clicking sound is from the purge valve opening up.
This procedure is simple and, if it seems confusing, this short video shows you exactly how to run a purge valve click test.
Purge Valve Vacuum Test
The purge valve vacuum test helps to identify a stuck open problem.
If the purge valve is leaking, it won’t perform its job of supplying the right amount of fuel vapor to the engine well.
One extra tool you need is a handheld vacuum pump.
The first step is to connect the vacuum pump to the outlet, which is where fuel vapor goes out to the engine.
You need the vacuum pump’s hose to be between 5 and 8 inches for it to fit well.
Once the hose is connected properly, switch on the vacuum pump and make sure the pressure is between 20 and 30 Hg. 30 Hg represents a perfect vacuum, and is the maximum vacuum pressure attainable (rounded up from 29.92 Hg).
Wait for 2 to 3 minutes and watch the vacuum pressure on the pump closely.
If the vacuum pressure reduces, then the purge valve is leaking and needs to be changed. If it doesn’t, then there is no leak in the purge valve.
In case the pressure does not reduce, then a further step you may take is connecting the purge valve to a power source, like the car battery for it to open up.
Once you hear a click, which signals that the valve has opened up, then you expect to see the vacuum pressure drop to zero.
If this happens, the purge valve is good.
Do You Need To Replace Your Purge Valve?
Testing your purge valve is simple. You either use a multimeter to check for continuity or resistance between the terminals, or run mechanical tests for clicking sounds or proper vacuum.
If any of these fail, then the unit needs to be replaced.
The cost of a replacement falls between $100 to $180, which also accounts for labor costs. However, you can also replace the purge valve yourself if you know the proper walk around.
Frequently Asked Questions
How Do I Know If My Purge Valve Is Stuck Open?
If a purge valve is stuck open, you experience engine idling, misfiring, running rough, or difficulty starting the vehicle. This is because excess fuel vapor is supplied to the engine.
What Happens If Purge Valve Is Stuck Closed?
When the purge valve is stuck close, the engine starts idling, you have difficulties starting the engine, or the engine light comes on. This is faster to notice than when the purge valve is stuck open.
What Is The Resistance Of A Purge Valve?
The resistance of a healthy purge valve is between 14 Ohms and 30 Ohms. This depends on the model and any value below or above this range signals a faulty purge valve.
Is A Purge Valve Supposed To Click?
Yes, a healthy purge valve clicks when connected to a power source. This represents it opening up for fuel vapor to be released from the charcoal canister and supplied into the engine.
Can You Clean A Purge Valve?
You can clean a purge valve without opening it by spraying carb or MAF cleaner fluid into the inlet and outlet. Cover both ends, shake the valve well, and let the debris drain out.