
How to test speaker output with multimeter
Whether for parties or personal listening sessions, having bad speakers entirely messes up the whole experience.
Does your speaker produce terrible sound or it doesn’t produce any audio at all?
In these cases, there could be an internal problem with your speaker, and testing it out helps you determine exactly where the problem is from.
A lot of people don’t know how to go about this and we are here to help.
Let’s get started.
How Do Speakers Work?
Speakers work by converting electrical energy to mechanical energy, which is, in turn, converted to sound energy for our ears.
The basic process involves electric current passing through a voice coil designed to interact with the permanent magnet in the speaker.
This interaction causes motion, as the voice coil is attracted and repelled by the magnet based on the type of current being passed through it (positive or negative current).
Pressure is created in the air by this motion and this is perceived as sound by our ears.
When there is a problem with the current being passed through the voice coil, the speaker does not function properly.
You see problems with the audio output and you want to make a diagnosis on what the exact problem is.
Tools Needed To Test Speaker Outputs
There are two methods of testing your speaker outputs and these have different tools
- A multimeter
- Multimeter probes
- 9-volt battery
- Wires
Before diving into the speaker with the use of these tools, you need to take some preemptive steps.
Preemptive Steps In Testing Speaker Output
- Carefully Take Out The Speaker From The Unit
Before testing a speaker, you have to carefully take it out of the device in which it is.
You disconnect it from the amplifier or carefully open up your device or unit and take out any component you need to take out to get to the speaker.
Once you get to the speaker, you will most likely see that it has been soldered to wires at its terminals.
Take note of where each wire goes, carefully unsolder these wires, and loosen any screws to take out the speaker.
- Physically Inspect The Speaker
As said earlier, you need to be sure that the electrical current passing through your speakers is the cause of the problem.
To do this, you ensure that all the physical features of the speaker are in good shape.
Gently use your fingers to inspect the speaker cone and every other component for rupture or damage.
If you find any physical damage, then you know that it may be the cause of the speaker not working properly.
A magnifying glass could prove useful here.
If you don’t find physical damage, then it is time to run your tests using a multimeter or using a 9-volt battery.
How To Test Speaker Outputs With Multimeter
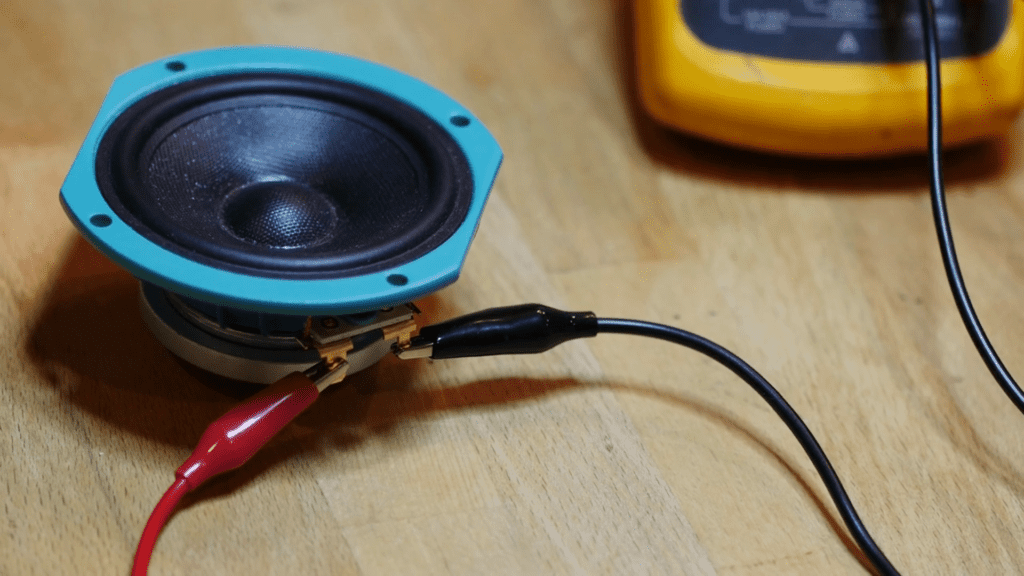
Set your multimeter to the lowest Ohms settings to read resistance, place the red multimeter probe on the positive speaker terminal, and place the black probe on the negative terminal. If the multimeter produces a reading of “O.L” or “1”, then the speaker’s wires are bad and need to be changed.
There is more to this method and we will go in-depth into it now.
- Set The Multimeter To Ohms
To test that the speaker outputs are okay, you need to measure the resistance between the terminals, and resistance, in this case, is usually termed “impedance”.
The higher the impedance, the more difficult it is for electrical current to be drawn from the amplifier or pass through the speaker.
This means that the resistance reading plays a major role in your diagnosis.
- Position The Multimeter Probes
Now you place your multimeter probes at the appropriate terminals to get proper measurements.
The terminals here are the points from which you soldered off the wires.
These points are bulges and come as negative and positive terminals.
Place your red multimeter probe on the positive terminal and place your black multimeter probe on the negative terminal.
If you don’t know how to differentiate between terminals, then our guide on identifying speaker polarity proves very helpful.
- Evaluate Results
At this point, your multimeter is expected to produce a reading.
Before evaluating results, there is one other thing you need to take note of.
Your speaker typically has an impedance or Ohms value listed at the back of it.
This is the maximum value that the speaker is expected to produce, and while in use, this value changes.
The lower the impedance, the better the audio output.
Looking at this, the best-case scenario is that the reading you get from the multimeter is as close to zero as possible.
This means that the connections are in perfect condition. The highest you want it to be is the recommended impedance on your speaker.
If the multimeter displays a reading of “O.L”, “1”, or a higher value than the recommended impedance, then the internal wiring is bad.
Here is a simple demonstration of this text.
How To Test A Speaker With A 9-Volt Battery
You may also run tests with a 9-volt battery, although this is not as accurate as the test with a multimeter. Wear protective gloves and follow these steps.
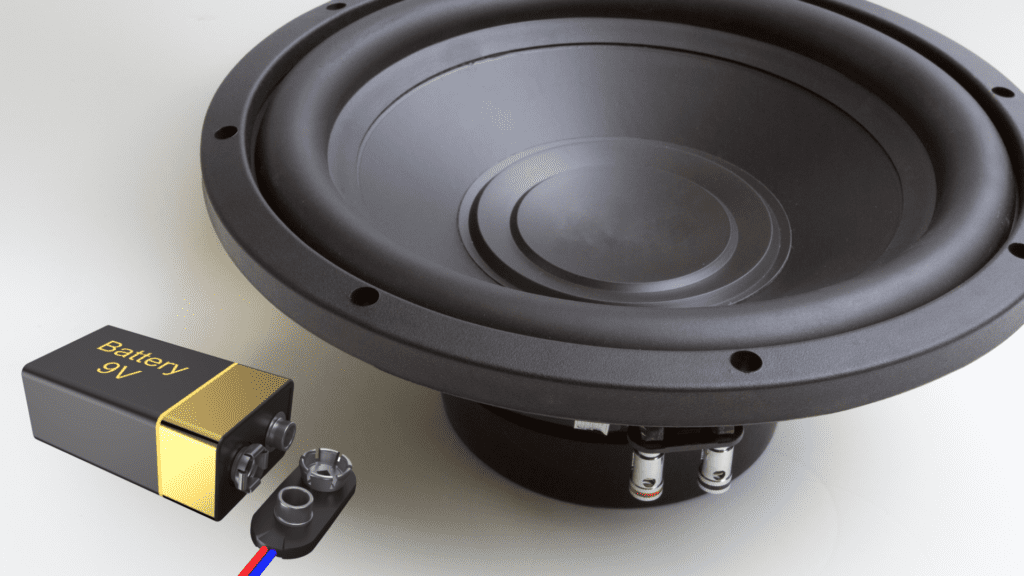
- Connect Wires To Terminals
Connect wires to the speaker’s positive and negative terminals. You need wires because the terminals on the speaker are farther apart than the terminals on the battery.
Alligator clips could prove useful in securing the connection on terminals.
- Test Speakers
To test, you simply place the wires on the battery terminals. You connect the positive wire to the positive battery terminal and then the negative wire to the negative battery terminal.
Make sure that you only place the wires on the battery for a short period of time.
- Evaluate Results
If the speaker cones move, then the speaker is working.
For further evaluation, if you appropriately connect the positive speaker terminal to the positive battery terminal and vice versa, the speaker cone pushes out.
In some models, the speaker pushes in and this means that all connections are okay.
If the speaker pushes in the opposite direction or doesn’t move at all, then there is a problem with the speaker’s internal connections and you may need to change it.
Here is a video that shows you how to do this test with a 9-volt battery.
Conclusion
Testing your speaker output is a simple procedure no matter the method you choose to use.
The multimeter presents you with the more in-depth and accurate results, while the battery test seems to be the faster option.
Frequently Asked Questions
How Can I Test Speaker Signal?
To test for power signal, play audio through it at a very low volume and listen to identify whether the speaker produces sound. If you don’t hear any sound, it needs to be changed.
How Do You Check Speaker Output On A Receiver?
Set the multimeter to AC voltage, place the multimeter probes at the speaker’s appropriate terminals on the receiver, play a tone of 500 Hz to 1khz, and check for readings between 2.3V and 2.5V.
How Do You Check Speaker Voltage?
Refer to the manual or check the body of the speaker for a recommended voltage output. You can also set your multimeter to AC voltage, play a tone, and obtain a reading from the speaker output wires.
How Can You Check If A Speaker Is Blown Out?
Play a tone through the speaker and listen for an unpleasant scratching or buzzing sound. An infinite reading when you connect multimeter probes to the terminals also signals a blown speaker.