
How to Test Christmas Lights with Multimeter
It’s the end of the year, and you have pulled out your Christmas lights to beautify your trees and other parts of your home.
You plug them in and realize that about half are not working.
Do you throw your Christmas lights away, causing unnecessary waste? Or do you look for what is wrong with them and apply a solution?
The second option looks like the better choice, and thankfully, there are multiple ways to solve this problem.
This article shows you how to diagnose and fix bad Christmas lights, including how they work and how you could do this with a multimeter. Let’s get started.
How Christmas Lights Work
To know where your Christmas lights could be having problems, it is important to know how they work.
Our major problem in this post generally relates to old-style Christmas lights.
Christmas lights either entirely exist as a “series” of lights on a single wire string or a parallel group of lights connected in “series” to one plug.
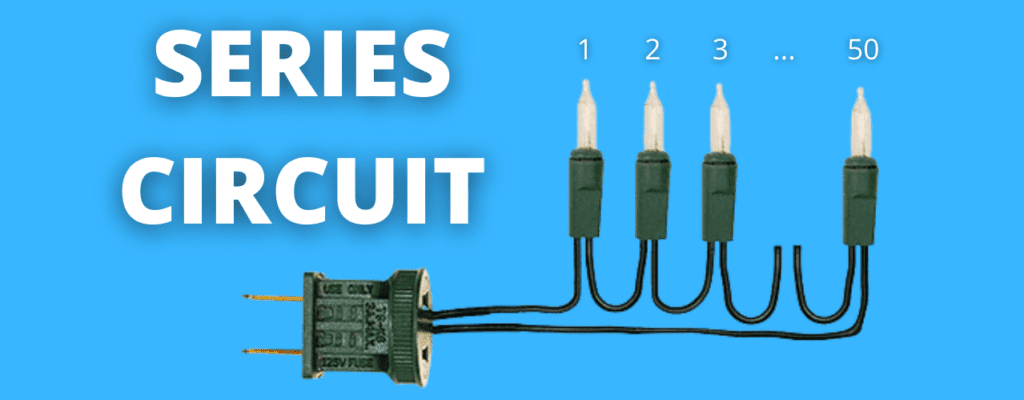
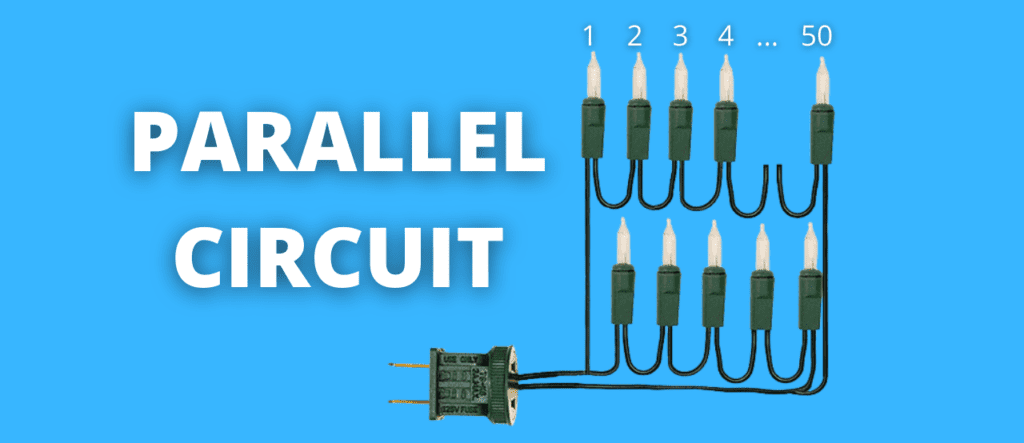
Either way, on the hot leg that goes through the bulbs, one bulb passes electricity to another on the same string, and this must continue for all the bulbs to light up.
Where there is a break in the circuit coming from just one light bulb, all the bulbs go off.
The Christmas light jack typically comes with a couple of fuses at the male jack end.
When one of these fuses goes bad, expectedly, electricity doesn’t go through, and the lights don’t come on.
A return leg goes from the male plug end to the female plug end without going through the bulbs.
This wire must also be in good condition for electricity to go through the whole string properly.
From these, we can see that there are three reasons your Christmas light bulbs may not come on;
- There is a problem with a bulb, most likely from a burnt-out filament.
- One or both of the fuses are bad.
- The return leg wire running through the entire string of lights is bad somewhere.
Required Tools To Test Christmas Lights
To test out your Christmas lights, you will need the following.
- Multimeter
- Positive and negative multimeter probes
- Extra working bulbs
- Voltage Tester
How To Test Christmas Lights With Multimeter
To test faulty Christmas lights, you set your multimeter to AC voltage and test for continuity between the female plug end and the male plug end. If the multimeter reads zero, then there is no problem with the wire string. You also check the fuses and then the light bulbs to further single out the problem.
All these involve a lot of other steps, and we will dive into them now.
Testing The String For Continuity
The first thing you want to do is test whether the return leg wire is okay.
This runs from the male plug to the female plug, so these are the points where you want to focus on.
Ensure your Christmas light isn’t plugged into any power source.
- Plug the red probe into the volt-ohms (VΩ) socket, plug the black probe into the common (COM) socket, and set your multimeter to ohms (Ω).
- Place one of your probes into one of the holes on the female side of the string and the other probe on one of the pins on the male side.
- If the multimeter reads zero, then the string is good. If the multimeter doesn’t read zero, recheck with a combination of holes and pins.
- Once this is done and none reads zero, the string has a problem.
P.S: One important thing to note is that if there is a problem with the string after doing this test, you should change the whole string of Christmas lights. This is because where there is no externally visible damage, figuring out where the problem could be is almost impossible.
Alternatively, the problem could be with one of the fuses.
Testing The Fuses
The fuses are typically placed between the prongs inside the male jack casing. Once you open up this jack part, visually check for a blackened fuse or a broken fuse filament.
You can alternatively check for continuity by placing your multimeter probes on each end of a fuse. If it reads anything other than zero, then the fuse is bad and needs to be changed.
In case the multimeter reads zero after taking these couple of steps, you proceed to check for problems with the bulbs directly.
If you don’t have a multimeter, see our guide on how to test a fuse without a multimeter.
Testing The Bulbs
As said before, when there is a problem with a single bulb, the entire string of bulbs does not light up. This creates a huge problem as you don’t know the exact bulb that has burnt out, and you have to check each bulb individually.
There is a hack to this. What you want to do is to check out multiple lights at the same time by grouping them.
You remove the first bulb on the string and place one of your multimeter probes into the hole. For instance, you remove the bulb at the middle of the string and place the second multimeter probe into the hole.
If the multimeter reads zero, all the bulbs between these two points are good. You then extend your range to a farther point and pick another bulb or point.
If the multimeter does not read zero, the problem lies between the two points you have placed your probes on. You then keep narrowing down by groups until you get the exact bulb.
Once you identify the faulty bulb, you replace it with one that is working, and your Christmas lights will come on.
This method of grouping is better than painstakingly checking each bulb individually. Here is a video that shows you this process.
The more modern Christmas lights don’t typically have this problem, though. Where there is a single burnt-out bulb, only that bulb goes off.
How To Test Christmas Lights With A Voltage Tester
A voltage tester, sometimes called a Christmas light tester, is a tool that beeps or lights up when it is in proximity to electric current. It has a single probe and does not need direct contact with naked wire before it serves its purpose.
Due to this, it is an easier tool to check for voltage within your Christmas wires and bulbs. Using a voltage tester is simple.
To check the string, you connect it to a power source and simply run the tester along the wire to hear beeps. If you don’t hear any beeps at all, then there could be a problem with a fuse. However, if you hear beeps and suddenly stop hearing, then there could be a break in connection at that point and you preferably have to replace the whole string.
You can also check the bulbs by placing the tester on them. If a bulb does not cause a beep, the voltage isn’t reaching it. This means the problem is with a bulb closer to the power jack. You change the last bulb that records a beep and see if the Christmas lights go on.
Conclusion
Diagnosing your Christmas lights is one of the simplest things to do when you have a voltage tester. However, not everyone has this and a multimeter is usually more available due to its multiple uses with other devices.
Regardless of what you use, your problem lies in the wire, fuse, or bulb, and you could save yourself some extra bucks if it is found. We hope you have successfully learned how to test Christmas lights with a multimeter.

Frequently Asked Questions
How Can I Tell Which Christmas Light Is Out Without A Tester?
To check which Christmas light is out without a tester, you place one multimeter probe into the first bulb hole and another probe into another. If the multimeter reads other than 0, then there is a bad light between these two bulbs.
How Do You Know Which Bulb Is Blown On Christmas Lights?
To know which bulb is blown, you best plug in your lights and place your voltage tester in a bulb hole in the middle of the unlit line of lights. If it doesn’t beep, you move the tester closer to the jack to identify exactly where the bad bulb is.

Author
Alex Klein is an electrical engineer with more than 15 years of expertise. He is the host of the Electro University YouTube channel, which has thousands of subscribers.