
How To Test Car AC Compressor With Multimeter
Barely anything gets more annoying than your car’s air cooling system blowing hot air during a very warm summer day. What then is its use in your car?
The car HVAC system brings a certain level of comfort for a lot of individuals during both hot and cold seasons.
Ironically, a majority of people don’t pay attention to it until one of its most important components spoils and the whole system entirely stops functioning.
The component we talk about here is the AC compressor, and as expected, not everyone knows how to make a diagnosis on it.
Let us teach you how to test car AC compressor with multimeter if you are unsure about your electrical skills.
Let’s get right in.
How Does An AC Compressor Work?
The car AC compressor is a component within your car engine that drives cool refrigerant through your HVAC system.
It does this mainly through the compressor clutch, and this is an electromagnetic unit that activates the AC compressor pump system when a signal is sent to it by the PCM.
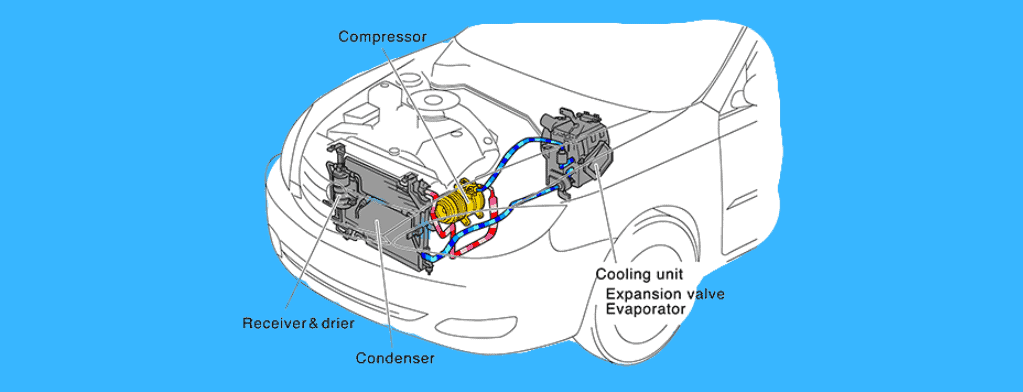
The whole air conditioning system involves six main components:
- AC compressor
- Condenser
- Receiver Drier
- Expansion valve
- Evaporator.
The compressor applies high pressure to the cool refrigerant gas which makes it hot.
This hot gas is passed to the condenser, where it is converted to a high-pressure liquid state.
This liquid passes to the receiver drier, which stores excess moisture, and is then passed to the expansion valve which converts the high-pressure liquid to a low-pressure liquid.
Now, the liquid is cooled down and passed to the evaporator where it is finally converted back to gaseous form.
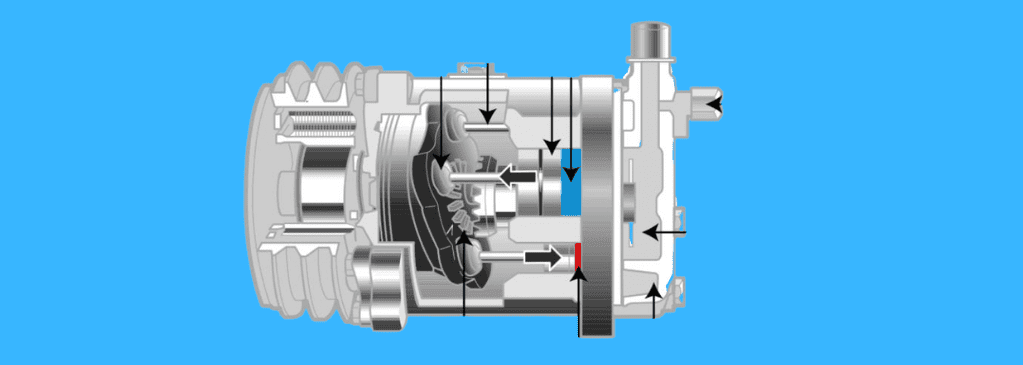
The compressor is the heart of this air conditioning system that pumps refrigerant (blood) for all other components to work properly.
When there is a problem with it, the whole air conditioning system performs woefully and starts showing certain symptoms.
Signs Of A Bad AC Compressor
Before the more apparent symptoms start showcasing themselves, you will probably notice that the air from your air vents is still cool but not as cold as before.
You then notice obvious signs like hot air coming out of your HVAC outlets.
Although, it’s important to note that these two signs may also be caused by an exhausted or leaking refrigerant and not a bad AC compressor.
Now, the more serious symptoms of a faulty AC compressor include the AC coming on and going off multiple times while in operation, or a high-pitched grinding sound (like when metal is scratched against metal) coming from your engine.
This is usually caused by a worn-out AC compressor bearing or a seized-up drive belt.
If you notice any of these signs, you need to test your compressor for faults.
However, to test the AC compressor, you first have to find it and proceeding to search for it without a guide is stressful.
Where Is The AC Compressor Located?
The AC compressor is located at the very front of the engine (engine bay), alongside other components within the accessory belt configuration. It interacts with the accessory belt through the compressor clutch.
Required Equipment To Test Your AC Compressor
All the tools you need to test your car’s AC compressor include
- A digital multimeter,
- Screwdrivers,
- A ratchet & socket set,
- And manual for your car’s AC compressor model
How To Test Car AC Compressor With Multimeter
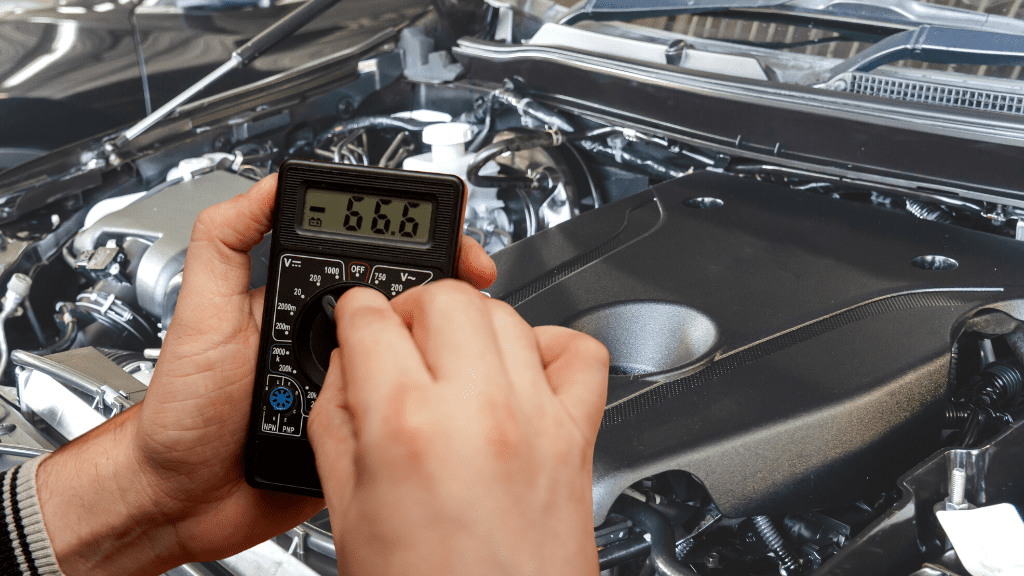
Detach the power connector from the AC compressor clutch, place your positive multimeter probe on one of the connector terminals, and place the negative probe on your negative battery post. If you don’t get any voltage, then the power supply to the compressor clutch is bad and needs to be checked.
There are a few steps before and after this procedure, and we will go to them in detail.
- Check For Burns and Other Physical Damages.
For this physical inspection and to avoid electrical shocks and hazards, the first step is to turn off the energy circuit supplying current to your air conditioning unit.
You then unscrew and take off the faceplate or access panel covering the conditioning unit to reveal its internal components.
This is when you inspect all the wires and internal pieces for burn marks and physical damage.
Now, you proceed to run a series of tests on the AC compressor clutch.
- Examine Ground And Energy At The AC Compressor Clutch
This first diagnosis aims to reveal the condition of your compressor clutch coils.
Set the multimeter to DC voltage and disconnect the connector from the AC compressor clutch.
Place your positive multimeter lead on one of the connector terminals and connect the negative lead to the negative post of your battery.
If you don’t receive voltage, alter the position of your positive lead to other terminals, or subsequently, change the position of your negative lead to the other battery post.
Eventually getting a voltage from one of these positions means that your compressor clutch coil is the likely culprit and you need to repair or replace it.
- Test Power Supply To AC Compressor Clutch
A zero voltage value from your meter indicates that your problem is with the power supply to the AC compressor clutch.
Thankfully, there are certain ways to pinpoint the exact cause of your problem.
Firstly, connect the positive probe to each of terminal 2 and terminal 3 of the compressor clutch (test them separately) and connect the negative probe to the negative post of your battery.
If you don’t get any reading from these, then the fuse and wiring to the relay may be bad and need to be changed.
If you got a voltage reading, proceed to place your negative probe on terminal 3 and your positive probe on terminal 4 of the connector.
A zero reading from the meter means that your PCM may be the issue, as it is not well grounded to the control relay spiral. This leads us to our next tests.
- Check Connectors To The Pressure Switch
When the previous test points to problems with your PCM grounding to the control relay coil, there are two main causes for this.
- Your refrigerant is almost finished or
- Your compressor pressure is at its maximum due to a faulty TMX valve or obstructed openings.
Of course, low refrigerant may be caused by your Freon (another name for refrigerant) running out, and high pressure may be caused by an overfilled tank.
Nonetheless, there is something we call the AC pressure switch. In a car, this is a pair of switches with valves located before and after the AC compressor.
This component helps to regulate the refrigerant supplied from the air tanks and turns off the compressor when conditions become favorable or extreme.
If these switches are bad, you may then have extreme low or high-pressure activity, causing the compressor to not work.
To test the switches, you first want to check their connectors.
Disconnect the power connector, place the multimeter probes on the positive and negative connector terminals, and put your car AC to its maximum strength.
If you don’t get a reading, then the connector wires are bad and you have to run repairs or change them.
If you get a value between 4V and 5V, then the problem may be with the switch itself and you proceed to run a continuity test on it.
- Measure Ohm Resistance Within The Switches
For the low switch, turn your multimeter dial to the Ohms (resistance) setting (represented by Ω), place any multimeter probe on terminal 5 of the switch and place the other probe on terminal 7.
If you get a beep or a value close to 0 Ohms, then there is continuity.
If you get a reading of “O.L”, there is an open loop in its circuit and it has to be changed.
These are the same for the high-pressure counterpart, except that you place your multimeter leads on terminal 6 and terminal 8 of the switch instead.
You are more likely to get an infinite Ohm reading (1) on the multimeter if the switch is bad.
Conclusion
Testing the AC compressor within your vehicle is a step by step procedure you want to pay close attention to.
However, all you simply do is use a multimeter to check the power supply to the AC compressor clutch and pressure switches, depending on how your diagnosis plays out.
You then make a repair on/replace these components if you don’t get the right results from them. The best policy is to replace the AC compressor entirely.
Frequently Asked Questions
How Do You Test An AC Compressor To See If It Works?
After you visually search for physical damage on the wires and internal components, make use of a multimeter to check the power supply to the compressor clutch and pressure switches.
How Many Volts Should An AC Compressor Get?
The power supply to the AC compressor should be 12 volts. This is measured from the compressor clutch connector terminals, as this is where the main power supply from the battery is directed towards.

Author
Alex Klein is an electrical engineer with more than 15 years of expertise. He is the host of the Electro University YouTube channel, which has thousands of subscribers.