
How to test a magneto coil with a multimeter
With modern vehicles, there is no end to where problems could come out from.
However, the older vehicles and engines present one more component to think about; magneto coils.
Magneto coils are important components within the ignition system of small aircrafts, tractors, lawnmowers, and motorcycle engines, among others.
A lot of people don’t know how to test these components for problems and we are here to help.
In This Guide, You’ll Learn The Following:
- What Is A Magneto Coil And How Does It Work?
- Symptoms Of A bad Magneto Coil
- How To Test A Magneto Coil With a Multimeter
- And Frequently Asked Questions
What Is A Magneto Coil And How Does It Work?
A magneto is an electrical generator that makes use of a permanent magnet to create periodic and strong pulses of current, rather than a constant supply of it.
Through its coils, it supplies this strong pulse of current to a spark plug which ignites compressed gasses in the ignition control system of an engine.
How is this pulse created?
There are five components that work together to make a magneto work:
- The armature
- A primary ignition coil of 200 turns of thick wires
- A secondary ignition coil of 20,000 turns of thin wire, and
- An electronic control unit
- Two strong magnets fitted into the engine flywheel
The armature is a “U” shaped component situated close to the flywheel and on which the two magneto ignition coils are wrapped around.
Going by Faraday’s law, any relative motion between a magnet and wire induces current and flow in the wire.
The engine flywheel has two magnets embedded at a particular point on it.
When the flywheel rotates and this point goes past the armature, it gets periodically supplied with magnetic fields by the magnets.
Remember the coils of wire are on the armature and, per Faraday’s law, this magnetic field supplies the coils with bits of electrical current.
Here you can see how to trace a wire.
This periodic supply of current builds up in the coils and reaches a maximum.
Once this maximum is reached, the electronic control unit activates a switch, and the contact points open.
This sudden release sends a flood of strong electric current into the spark plugs, firing up the engine. All these take place in a few seconds.
Now, the magneto may stop serving its purpose effectively and the culprits are usually the coils.
Symptoms Of A bad Magneto Coil
When a magneto coil is faulty, you experience the following
- The engine warning light illuminates on the dashboard
- Difficulty starting engine
- More distance traveled by gas
- Lack of acceleration power
If you notice any of these, the magneto coils could be the problem.
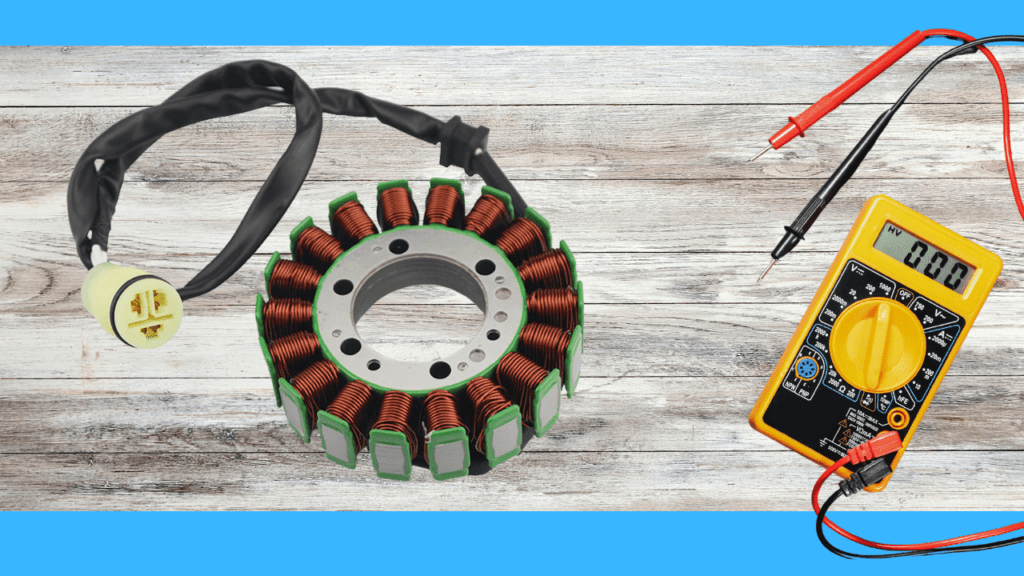
Just like when testing other electronic devices and components, you need a multimeter to test these coils.
How To Test A Magneto Coil With a Multimeter
Take off the rubber casing, set your multimeter to Ohms (Ω), and make sure the Ohm range is set to 40k without any auto-ranging. Place the multimeter probes at the magneto copper winding and the metal clip under the rubber casing. Any value below or above the 3k to 15k range implies that the magneto coil is faulty.
This is only the basic and most straightforward description of what you have to do, and further explanation is needed for a proper understanding of the process.
- Detach The Flywheel Shroud
The first step is to detach the flywheel shroud from the whole setup.
The flywheel shroud is a metal casing that covers the magnetic and is kept in place with three bolts.
Engines made in the 1970s typically have four bolts holding the shroud.
- Find The Magneto Coil
Once the shroud has been taken off, you locate the magneto coil.
Finding the magneto coil shouldn’t be a hassle as it is the only component behind the shroud with exposed copper windings or metal core.
These copper windings (the armature) form a “U” shape.
- Take Off Rubber Casing
The magneto coil has wires protected by a rubber casing that go into the spark plug. To test it out, you have to take off this rubber casing from the spark plug.
- Set Your Multimeter Dial
For a magneto coil, you measure resistance. This means that your multimeter dial is set to Ohms represented by the Omega symbol (Ω).
Rather than opting for auto-ranging, you manually set your multimeter to the 40k Ohms range. This is because auto-ranging gives you very unreliable results.
- Position Multimeter Probes
Now, to measure resistance within your magneto coil, there are two things to do. You want to measure the primary and secondary coils.
For the primary coil, place the red multimeter probe on the “U” shaped winding and ground the black probe on a metal surface.
To measure the secondary coil, place one of your multimeter probes on the “U” shaped metal core (winding) and place the other probe in the rubber casing at the other end of the magneto.
While this probe is in the rubber casing, you ensure that it touches the metal clip on it.
Here is a video that shows exactly how to measure primary and secondary magneto coils.
- Evaluate Results
Once the probes have been placed on the different parts of the magneto, you check the multimeter for readings.
The readings are presented to you in kilo ohms and should be between 3k and 15k, depending on the type of magneto you are testing.
Referring to the manufacturer’s manual helps you with this. Any reading out of this range means that your magneto coil is faulty.
Sometimes, the multimeter may display “O.L”, which means that there is an open-loop or short between those two points. Either way, the magneto coil needs to be changed.
In addition to these, there are certain tips to take note of.
If the multimeter produces a reading higher than 15k, the culprit may be the connection between your high voltage (HV) wire at the coil and the metal clip that goes to the spark plug.
If all these are checked and the magneto produces proper Ohm readings, then your problem may be with the spark plug or weak magnets in the flywheel.
Check these components out before deciding to change the magneto.
Frequently Asked Questions
How Many Ohms Should An Ignition Coil Have?
A good magneto coil produces Ohm reading between 3k to 15k depending on the model it is. Any value below or above this range signals a fault with it and you may need to replace it.
How Do You Test A Magneto For Spark?
To test a magneto for spark, you make use of a spark tester. Connect the alligator clip of this spark tester to the magneto coil, try to power up your engine, and see if this tester produces a flash.
How Do I Test A Small Engine Coil With A Multimeter
Simply place the multimeter probes on the “U” shaped metal core and the spark plug metal clip at the other end. A reading outside the 3k to 5k Ohms range means it is faulty.
How Do You Test A Magneto Condenser
Set your meter to Ohms (Ω), place the red probe on the hot connector, and ground the black probe on a metal surface. If the condenser is bad, the meter doesn’t produce any consistent reading.
How Many Volts Does A Magneto Produce?
A good magneto generates about 50 volts. When a coil is introduced, this value increases to 15,000 volts, and this can be easily measured with the use of a voltmeter.